
 Here's my attempt at "How to make a Stuffed Something". This is for you, Vanessa and any of my little non-sewer friends. You can do this!! If tutorials can have dedications, then this one is dedicated to you! I've created this little elephant, who I'm not sure isn't an anteater, but we'll just go with it. :) I'll be putting the instructions, below each picture.
 Materials:
2 ~ 9" squares of fabric for body
(doesn't have to be exactly 9", can be a scrap of whatever. Just needs to be big enough to draw pattern and have some extra room on the edges.)
4 Coordinating scraps for ears
6 strands of crochet thread for tail
Poly-fil stuffing
Freezer Paper to make pattern
Squeaker (optional sound :)
Download Pattern Under Goodies and Tutorials
Des Definitions: Right Side= pretty side of fabric
Wrong side=ugly side of fabric
 I use Reynolds Freezer Paper to make a pattern that I can trace over and over. I use it for all of my applique and I like it for these little patterns, as well. You can find it at the grocery store, I believe by the Ziploc-type bag section. Pull out about 9 inches and rip across. Place on top of the pattern, shiny side down. You'll be tracing on the dull side. If pattern isn't showing through, you might trace over the lines on the pattern with a darker black pen.
 Trace around your shape with pen.
  Be sure to trace out ear as well.
 Now, you will fold the freezer paper in half, shiny sides touching.
 Take to the ironing board. Freezer paper is adhesive with heat. So by pressing the two shiny sides together, you are creating a thicker pattern. Just move your iron around the drawn lines and hold it there a bit. It doesn't take long for it to adhere. Don't iron on the shiny part. It won't ruin your iron but it's probably not great for it???
 Cut out the patterns on the pen line. It's not in the picture, but I will often write on the pattern, "Cut 2" or "Cut 4". These will hold up to many, many tracings. If you think your pattern is starting to get a little smaller, just make a new one!
  Put your cut out elephant back on top of the pattern and mark a straight line for the ear placement.
  Poke a pin in the bottom and top of the line. Trust me, it's very helpful.
  On the wrong side of one of your 9" squares, trace around the pattern. I prefer pencil, just didn't have a sharp one at the moment. :)
 Cute! Be sure to mark the opening spots on the right.
 Helpful hint coming up: With a blue water soluable marker OR pencil, lightly mark through the pin holes onto the wrong side of fabric on the pattern you just traced. Now just hang here with me for a minute. This isn't complicated but I'm going to find someway to make it very confusing.
Your little pen markings are going to show through to the other side so that you'll know where to line up your ear on the RIGHT side of the fabric. 
See? They came through beautifully. Now, hold that thought.

Now, on your other square of fabric that DOES NOT have the elephant traced on it, kind of eyeball (i know, it's not an exact science, but...you can do it!) on the RIGHT side of fabric where you would place the pattern of the elephant on. I did NOT use a big enough piece of material for mine, so you, be smart and FOLLOW my 9" suggestion of a square of fabric. Mark again with blue pen for ear placement. Now let's make some ears.
 For the ear, I traced it on the RIGHT side of the fabric so that I could see where my flowers went. I did this twice, once for each ear that would be showing. Are you with me?? So in the picture above, I have just folded my material in half,(wrong sides together) and then I will cut on that line and be ready for the next step. Do that twice.
 Cut out just a smidge inside the drawn line. You don't want to see that line once it's cut out. There are 4 ears layered here.
 I'm giving Charlotte here, a little raggy ear. Why not. Place 2 ears WRONG sides together. Sew around the edge of the ear with a zigzag stitch. Be sure at the beginning and end of stitching that you backstitch OR tack a few stitches in place so that your zigzags don't come undone. Just a friendly tip!
  With the blue dot markings you made earlier, line up the straight edge of your ear with the dots. Make sure your ear is going in the right direction. Curved part should be AWAY from the nose part. Forgot to take a picture of this, but now you are going to sew a zigzag along the straight line. You are now sewing the ear to the polka dot fabric. Again, tack your first zigzags down or backstitch.
 Here is what it looks like from the back. Those little knots are where I 'tacked' my stitches. My machine has a locking stitch. Vanessa, Oma's machine probably doesn't have that, so just do a little backstitch/reverse. Look it up in the manual. :) xxoo Now we need to think about the tail.
 I chose to go with a little braided tail made out of some fine cotton crochet thread. I also think a little piece of RickRack would be cute or you could use embroidery floss. I used 6 strands and they measure about 7".
 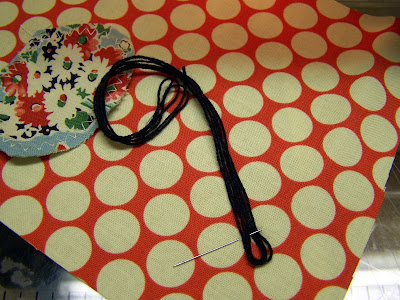 Working with the square that has the elephant traced on it, line up your strands where you think his tail should be. You're going to eyeball where to place the strands on the RIGHT side of the fabric. Then pin them into place from the WRONG side of the fabric. Also, curl the strands in so that they will not be sewn over when you are sewing on your drawn lines. Hello? You okay?
 With the tail attached and ears sewn on, you are ready to put Charlotte together. Place your two squares right sides together. Match up your ears so that they are lined up and touching so that your elephant doesn't have a lopsided head. But you know, if he does, it's okay. Because not all stuffed creatures are created equal. They need to be different and unique. So don't panic. Remember your tail should be inbetween the two layers and it should be inside the elephant shape. Whew, that was a lot of work.....Now we're going to sew!
 Set your machine to a smaller stitch than usual. We're talking the length of the actual stitch. I like mine around 1 or 1.5. The bigger the number on your machine the larger the stitch. See my tiny stitches. Tiny stitches for tiny projects. :) You have marked where you'll be stuffing the elephant, so don't sew between the 2 markings. Starting at the 'bottom opening', backstitch, and then sew directly on the line. Sew nice and slow and make pivots at the corners and smooth curves. Just go slow and reposition a lot if you need to. Friendly tip: I go back and forth over the area where her tail is. I just want it to be super secure. I use my backstitch/reverse ALOT.
 Once you've gone all the way around, backstitch again at the end opening. Trim around, leaving a small seam allowance. At the feet corners, I try to trim away the corners so they don't get bulky. Also, where the opening is, I leave a bigger seam allowance and it allows for easier turning when finshing up.
 Also, clip your inside curves. This will allow the fabric to mold nicely once it's stuffed. (I have no idea what that means, but it sounds lovely)
 Now, I stick my index finger in the opening and go straight for her nose so I can start the 'turning inside out' process. It might be a bit uncomfortable....for Charlotte.
 Ta-Da. Isn't she attractive?
 This is where a nice blunt object comes in handy. I love to use a wooden knitting needle. Get creative and find something that will do the job. You don't want anything sharp that will actually poke through and rip fabric. That's a no-no. This needle will get into all the nooks and crannys without ripping and tearing. Stick it in the opening (this is where it gets uncomfortable) and work on the nose first and then move to the legs. Smooth out her back by rubbing the seam between your fingers.
 She's all tuckered out. You did a great job. Press her.
 I decided to go for the braided tail look. So with 6 stands I braided and then knotted off at the end. Trim off any excess tail so it doesn't drag through the African mud.
 Because Charlotte has some small spaces to stuff, you want to start with those tough places first. I go straight for the nose.
  Take just a pinch of stuffing and head for the nose and very gently yet firmly shove the stuffing down into the nose with your blunt object. :) For the nose and legs, continue using small pinches of stuffing until those parts are filled. Then you can use bigger pieces for the rest of the body. You think it won't take much stuffing to fill these, but it does. I prefer mine kind of tight. Some might like their friends, softer. Just a personal preference here. But just keep stuffing until your satisfied. I use my knitting needle a lot to shove and adjust stuffing. GENTLY, and LOVINGLY, of course. Charlotte has feelings.
 Sometime when you're in the ear area, I will place a squeaker in there as a little suprise. I find the squeakers here under 'dog toys'. Who knew?? Hide under the ear area so it doesn't protrude and look like a cancerous growth in there.
 Now for a little touch up. Fray Check is my friend. I would put a little bit around the raw edges of her ears to keep from fraying. But if you don't have any, she will still live a long and properous life, just like Spock.
 Let's close her up. Pin the opening, if that helps, and you can whip stitch by hand,
  or I like to do an invisible stitch so that you can't see my stitches. That's by hand also. But that's for another tutorial. I have the pictures, just need to get it downloaded.
 I will show you that after I have finished sewing up the closing, I make a double knot and then to hide the bulk of the knot, I place my needle in right next to the knot, shove (ouch part, again) it into the middle of the elephant and hide the thread in the middle. Pull tightly and snip.
 She's a beauty! This tutorial is the basic idea. For most of my 2D animals, I like to draw the pattern directly on the fabric and sew on that line. It works for most but there are definately other ways to do it as well. Just one crazy woman's way. Good Luck!
SO awesome! I never thought about just sewing on the lines and cutting it out later. Genius!
ReplyDeleteI've been searching on and off for a cute elephant pattern all summer...this is totally cute and gives me great ideas for other small animals. LOVE IT!!
ReplyDeleteThis comment has been removed by the author.
ReplyDeleteYOu are brilliant ... my 4 year old for reasons only known to him ... wants tp make his grandfather and elephant .. and what do i find ... yours!! THANKS SO MUCH!!
ReplyDeleteBrilliant and most humourous, thank you!
ReplyDeleteI have always ironed the freezer paper to the fabric and then traced around it, stays put that way. never thought of making it thicker by ironing it to its self. Or maybe you could iron the traced pattern thats on the freezer paper to a square of fabric and and just sew around the pattern. With the small stiches it should tear really easy. I am going to try it your way too.
ReplyDeleteElephants with spots are so cute,
ReplyDeletethanks for showing me how to make
one for my young ones. grace at
amnet dot net dot au
I love the pattern so simple and easy to make! I also love the tutorial, it's clear and easy to follow! Thank you so much for sharing! I featured this in my blog: http://www.plushiepatterns.com/elephant-plushie-pattern-by-quilt-taffy/
ReplyDelete